“How to Get the Most Out of Your Digital Point & Shoot Camera. Part I”
A photograph is a visual, two dimensional, frozen moment in time. Not all moments are good moments…
When you take a photograph you want it to remind you of the moment, but you also want it to convey the feeling of the moment as well. These two elements, as well as others, are crucial to good photography.
The first element is easy. You are somewhere, doing something. You have a P&S (point & shoot) camera, so you point and shoot. Viola! Mission accomplished. You now have an image that reminds you of the moment. And that is fine if that satisfies your needs. If that is enough for you read no further.
If you want to freeze that moment in a way that grabs your heart and mind and makes you think, “Yeah, that was great and look at that picture!” then you need to approach your subject in a more thoughtful and deliberate way before you push the shutter button on the little camera.
There are full on courses in photography, ranging in subject matter, from the technical aspects of cameras and light, to composition and artistic approaches. These are designed and aimed at those who want to pursue photography as a serious amateur or professional endeavor. What I propose to do in this series of blog posts is to help the everyday person who owns a P&S camera get better results.
So, let’s get started with the first of this series of tips on “How to Get the Most Out of Your Point & Shoot Camera.”
THE GOOD! P&S digital cameras are light, small, simple to operate and show you a picture in an instant.
THE BAD! P&S cameras offer little control over shutter speed and aperture, two critical adjustments that determine how motion is conveyed and what is in focus in your picture.
THE UGLY! What your pictures will often look like if you don’t know your camera and what it can and can’t do.
The first thing you want to do with your P&S is read the manual, even if you don’t understand everything in it, read it from cover to cover. Next open all of the menu options and settings and figure out what they do. The programmed shooting items, like Macro, Backlit Subject etc. will make a big difference in how good your pictures turn out. These settings are the only controls you will have, otherwise your camera left to it’s own devises, will often leave your photos wanting.
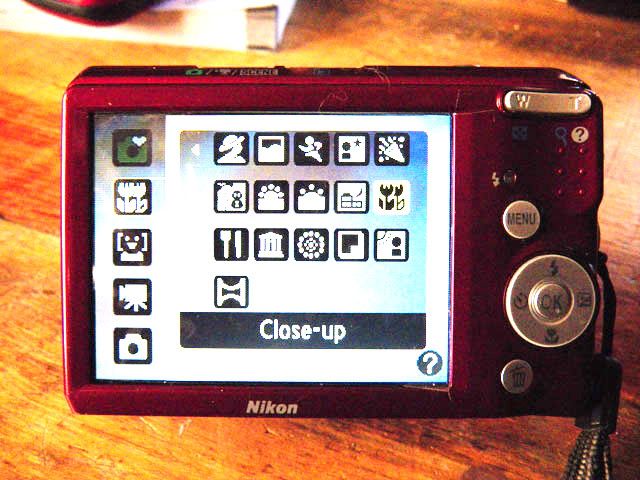
EXAMPLE #1 – Macro setting. Taking pictures of small subjects like flower blossoms or insects (flies) require the lens to focus closer than it will do under normal shooting settings. In order for the camera to focus close up you must select this option on the shooting menu.
P&S cameras offer very little control over how you get to take your picture. Their main advantages are that they are small and smart. The trouble with the smart part is that, smart to a P&S camera is getting a picture that adheres to the physical laws of optics and light under a strict and limited range of possible scenarios, not necessarily the scenarios that you are trying to photograph.
So, Rule Number 1: Know your camera and what the limits are of your P&S.
Baby steps
Next time I'll discuss how to look at the LCD screen and how it affects the results you'll get when you push the shutter button
What You See Is What You Get
What You See Is What You Get
Last time I discussed knowing your camera. Hopefully, you’ve read the manual and have explored and familiarized yourself with the various shooting modes of your camera. This time I’ll go over some basic ways to keep your pictures from looking like a jumbled mess of clutter and some ways to make your portraits more pleasing to the eye.
There are several things you need to be aware of as you’re composing that perfect picture on your P&S LCD screen.
Looking at your screen as you compose your shot, you think what you are seeing is what your picture will look like. In most cases you can rest assured that is what will happen. Trouble is we don’t always see exactly what we are looking at and the camera could care less, so don’t expect any beeps or flashing lights to go off warning you that you’re
screwing up.
 | |
| This river actually flows from left to right. |
 |
| Rule of Thirds Grid |
The “Rule of Thirds”
Simply put the Rule of Thirds states that objects of attention should be placed at the intersection of dividing lines.

A common problem when taking a portrait of someone is the “telephone pole growing out of her head” phenomenon. Here again this is caused by tunnel vision on the subject and not paying attention to background objects. The first thing you want to do is to set your camera’s function “mode” on “portrait” (that’s the little icon that shows a person from the shoulders up) when taking portraits of people. The camera will set the aperture to wide open which will help to blur the background making for a more pleasant portrait.
Remember we are dealing with a two dimensional medium here. The camera flattens out depth, making distant objects appear right up against objects in the foreground.
A more important solution to this problem is to be aware of backgrounds and compose your portraits with your subject’s “head in a clean spot.” Placing your subject’s head against a blank wall, the sky, or the ocean are examples of “head in a clean spot.” Simply squatting down slightly to get your subjects head against a blue sky will achieve much better results. Be careful doing this though as it can result in other problems, like having your subjects face look like a horses head if you squat to low. Have your subject lean slightly forward and tilt the head slightly down toward the camera. The opposite approach, getting higher above your subject and shooting down with the subject’s head against a nice green lawn also works well.
One more thing of note, without getting into a long drawn out discussion on portraiture is using flash. Generally, I avoid using the flash, but if your subject is backlit by the sun, your subject will be seriously underexposed unless you use a setting for that in your Shooting Mode Menu. It’s the icon with the person with the sun over her shoulder. Use this setting when your subject is backlit by the sun, and you don’t want to use the flash.
Everything I’ve discussed so far is subjective and in no way suggests that this is the only way to take good pictures. These are simple guidelines to help you get generally more pleasing pictures from a Point & Shoot camera. There is an enormous amount of subject matter available for those who wish to delve deeper into the art and science of photography. I am attempting to shed some light on the most common frustrations faced by the novice who wants to improve his/her photos.
I hope you are enjoying this series so far and will continue to follow it to its conclusion. (if there really is one)
Next time I’ll discuss blurry pictures and what you can do to make all those things you’re trying to photograph stop moving.
Part III Blurry Pictures
There are three ways that you can get blurry pictures; camera movement, subject movement and being out of focus.
1. Camera movement – When your camera determines the right exposure for your picture will require a slow shutter speed, you must hold the camera perfectly still, or use something to stabilize the camera i.e. a tripod, etc.
Some things you can do to help prevent camera shake are, hold the camera securely with both hands, rest the camera on a stationary object like a table top, brace yourself against a wall or tree, take a deep breathe and push the shutter as you slowly exhale. Always use the camera’s image stabilization feature if it has one. Remember, if you use the zoom, your camera is more likely to use a slower shutter speed and require stabilization the more you zoom out. Finally, use the flash.
2. Subject movement – If your subject is moving, your camera needs to use a faster shutter speed to stop action. Look in your Shooting Menu for the “sports” icon and choose that setting. This will tell your camera to opt for the highest shutter speed possible at the expense of the smaller aperture for greater Depth of Field. Some other helpful ways to avoid blur by subject movement are: use the flash to stop action if you are close enough to your subject, or increase the ISO setting but don’t go nuts with a high ISO as this will result in degraded image quality. Again, use care that you are not the one that is moving.
3. Out of focus – Most often your camera will do a good job of auto focus, but under certain circumstances the camera may fail to focus on what you want it to. When you push the shutter half way down most cameras will sound a beep letting you know it has focused and you can push the shutter all the way down. Trouble is these P&S cameras focus on what ever is in the center of the LCD screen. This generally makes for lousy composition. (see the Rule of Thirds above) To solve this problem, push the shutter half way and focus on your subject, then while holding the shutter half way recompose your shot and then push the shutter fully.
 |
| In this photo I captured "The Decisive Moment" |
One of the nicest things about these little photographic marvels is that you get to see your pictures in an instant so you can adjust what ever doesn’t please you and shoot again until you get it right. Don’t let this become a crutch though because each time you push that shutter you stop a Moment In Time and not all moments are created equal. That perfect look, or as the great photographer Henri Cartier-Bresson called it “The Decisive Moment” is fleeting and gone in an instant never to come again.
So, learn your camera, it’s strengths and weaknesses, it’s limitations and idiosyncratic quirks. When knowing when to use your cameras features becomes second nature that “Decisive Moment” is less likely to disappear before you can capture it for eternity.